Update to the previous Chicken and Waffles
I've made the chicken and waffles again. Same waffle recipe as before, but I changed the herbs and spices in the bread crumb mixture. I also used maple syrup over the waffles. It was tasty, especially with the spicier breading. The herbs this time were: cayenne, paprika, salt, oregano, ground coriander, powdered onion, powdered garlic, marjoram, and thyme.
(I didn't bother taking more photos.)

Tuesday, 19 May 2015

Friday, 17 April 2015
Chicken and Waffles
Another first. I've never made or had chicken and waffles. I had 2 chicken breasts that I had to use up. I barely ever use my waffle maker, probably because when I lived with my parents my mom wanted banana waffles every weekend. I kept making them, but eventually stopped wanting to eat waffles--for a long time.

So here is my version of chicken and waffles. Again, I used what I already had in my kitchen.
Chicken
• chicken meat (I used 2 breasts, but used whatever parts you want)
• bread crumbs (regular, panko, or crush something non-sweet like corn flakes)
• butter for frying
• spices: oregano, thyme, salt, pepper, cayenne, Cajun mix--mix into bread crumbs
• egg, whisked for batter to stick
Slice the meat into thin strips, dunk in egg, then in bread crumbs. Fry in hot butter.
Waffles
I made up this recipe because I wanted something plain to go with the flavourful chicken, but feel free to add savoury flavours.
• 1 cup flour
• 1 cup milk (I didn't have milk, so I diluted 10% cream with water)
• 2 tsps baking powder
• salt
• 1 egg
• melted butter for batter
Melt butter. Mix flour, baking powder, and salt. Whisk egg into milk, and add to dry stuff, then add melted butter. Use hand mixer. Pour batter into waffle maker, 1/4 - 1/2 cup per waffle, depending on your machine. I don't measure, just eyeball it. Once you make a couple you'll know the amount that won't overflow or leave too many holes. This made 8 rectangular waffles. You can halve or double the recipe, or whatever amount you need.
Enjoy!
Friday, 10 April 2015
Ossobuco and Risotto
Here goes my bi-annual post. I'm really not very good at keeping up with this blog. Life gets in the way. I have a few hundred photos of food, and can't even remember all the ingredients for some of those dishes. Spring is in the air, but it's still cool and damp enough for comfort food.
Today I made ossobuco and wild mushroom risotto. This dinner was fairly inexpensive. I used ingredients that I already had. This was the first time I made ossobuco, though it wasn't the first time I've eaten it. I didn't use a recipe, because I wanted to use stuff I already had. The ossobuco I bought a few weeks ago, but didn't have a chance to make it then, so I froze it. For 9.40 CDN, it was enough for 2, and lots of marrow and gooey bits. Mmmm.

Here is what I used and did, but feel free to substitute anything. If you're familiar with my way of cooking, you'll notice that I eyeball amounts, and often don't make the same thing twice (because I like to use up what I have).
Ossobuco
• Melt butter in a pan or pot, something that has a lid and isn't too shallow.
• Take the veal and cover both sides in flour, then fry on both sides for about 10-15 minutes.
• Remove meat from pan, put it on a plate, then add sliced onions and garlic, simmer for a bit, add chopped celery, basil, tomato, lemon balm (or lemon peel or some other lemon herb). Stir, then add stock (I used turkey, because I roasted a whole turkey last week, so I saved the stock, used a bit for this, and froze the rest for future use).
• I also added a bit of white wine vinegar and a bit of red port. Ideally I would've used white wine, but I didn't have any. Veal works with reds and whites, so you can choose which you want, or mix.
• Place the veal in the pan, cover and simmer for 2-2.5 hours.
• This yummy sauce covers the veggies in this meal.

Risotto
• Melt some coconut oil or lard in a pot.
• Coat (dry) short grain rice in the fat. I used Arborio.
• Add 3x the liquid relative to the dry rice, but do it about 1/2 cup at a time. I used water, but you can use stock. Since the ossobuco is rich, I wanted the rice to be light, which is why I didn't add grated parmesan at the end.
• After the first or second portion of liquid, add spices. I used rosemary, tarragon, thyme, salt, pepper, celery seed, and dehydrated mushrooms. Keeping dry mushrooms in your pantry is awesome, they add so much flavour to all kinds of things, are inexpensive, and have a lengthy shelf life (just keep them in a dry place).
• Keep adding the liquid.
• Part way through I added a piece of Grana Padano rind (a cheese similar to parmesan, but milder), just because I had it and wanted to use it up. You can add grated cheese (parmesan or something like it) at the end to add flavour and creaminess, but like I said I wanted to keep it light. The mushrooms and herbs added lots of yummy flavour.

Today I made ossobuco and wild mushroom risotto. This dinner was fairly inexpensive. I used ingredients that I already had. This was the first time I made ossobuco, though it wasn't the first time I've eaten it. I didn't use a recipe, because I wanted to use stuff I already had. The ossobuco I bought a few weeks ago, but didn't have a chance to make it then, so I froze it. For 9.40 CDN, it was enough for 2, and lots of marrow and gooey bits. Mmmm.
Here is what I used and did, but feel free to substitute anything. If you're familiar with my way of cooking, you'll notice that I eyeball amounts, and often don't make the same thing twice (because I like to use up what I have).
Ossobuco
• Melt butter in a pan or pot, something that has a lid and isn't too shallow.
• Take the veal and cover both sides in flour, then fry on both sides for about 10-15 minutes.
• Remove meat from pan, put it on a plate, then add sliced onions and garlic, simmer for a bit, add chopped celery, basil, tomato, lemon balm (or lemon peel or some other lemon herb). Stir, then add stock (I used turkey, because I roasted a whole turkey last week, so I saved the stock, used a bit for this, and froze the rest for future use).
• I also added a bit of white wine vinegar and a bit of red port. Ideally I would've used white wine, but I didn't have any. Veal works with reds and whites, so you can choose which you want, or mix.
• Place the veal in the pan, cover and simmer for 2-2.5 hours.
• This yummy sauce covers the veggies in this meal.
Risotto
• Melt some coconut oil or lard in a pot.
• Coat (dry) short grain rice in the fat. I used Arborio.
• Add 3x the liquid relative to the dry rice, but do it about 1/2 cup at a time. I used water, but you can use stock. Since the ossobuco is rich, I wanted the rice to be light, which is why I didn't add grated parmesan at the end.
• After the first or second portion of liquid, add spices. I used rosemary, tarragon, thyme, salt, pepper, celery seed, and dehydrated mushrooms. Keeping dry mushrooms in your pantry is awesome, they add so much flavour to all kinds of things, are inexpensive, and have a lengthy shelf life (just keep them in a dry place).
• Keep adding the liquid.
• Part way through I added a piece of Grana Padano rind (a cheese similar to parmesan, but milder), just because I had it and wanted to use it up. You can add grated cheese (parmesan or something like it) at the end to add flavour and creaminess, but like I said I wanted to keep it light. The mushrooms and herbs added lots of yummy flavour.
Easy and delicious!
Friday, 19 December 2014
Bruschetta
I'm awful when it comes to posting in here. Truth be told I'd rather spend time making food than blogging about it. I post more frequently in Yummy Recipes (general recipes) and in Metal Porkchop (ferments) on Facebook, because it's faster. However, today I'm sick and don't feel like doing much, so here I am. I can't believe the last post I made was in January. Geez!
By lunchtime I had enough energy to make a tasty meal. So if I can make it while I'm sick, anyone can make it whenever.

I used 4 heirloom tomatoes, a variety that I grew this summer and then froze. Home-grown sun-ripened tomatoes of any variety can't be beat in flavour. I realize that not everyone has access to such treats, so to make up for the loss of flavour, add a bit more spices and a pinch of sugar--the pinch size depends on the size of your batch. It's easier to add than to take out, so always taste before adding more.
Here are the steps:
Heat up butter, add chopped garlic--local is best and most flavourful. The amount depends on your taste buds. I used 4 cloves for my single serving, because I love garlic, plus it's an antibacterial, which I need right now.
Then add chopped onion. I used one small local onion.
I scored a 10 lb bag for 99¢ (compared to $3 for 2 heads of garlic). Small onions are great for use with daily meals, because you can use a whole one and not have to bother with storing the other half.
Side note: If you don't mind the onion smell, onions are a great way to clean the air: just leave a wedge on a plate.
Simmer for a few minutes, then add rosemary, oregano, thyme, and basil. Stir and add tomatoes. Simmer until they soften. After 15 min or so, if you have too much liquid, remove the lid and simmer until most of it cooks off.
Slice a baguette, toast it if you like, and top each slice with the tomato mixture. You can stop there, or keep going. I added slices of lachsschinken and marscapone. The 4 pieces were my lunch, but if you're making these as appetizers, you can make smaller servings.


By lunchtime I had enough energy to make a tasty meal. So if I can make it while I'm sick, anyone can make it whenever.
I used 4 heirloom tomatoes, a variety that I grew this summer and then froze. Home-grown sun-ripened tomatoes of any variety can't be beat in flavour. I realize that not everyone has access to such treats, so to make up for the loss of flavour, add a bit more spices and a pinch of sugar--the pinch size depends on the size of your batch. It's easier to add than to take out, so always taste before adding more.
Here are the steps:
Heat up butter, add chopped garlic--local is best and most flavourful. The amount depends on your taste buds. I used 4 cloves for my single serving, because I love garlic, plus it's an antibacterial, which I need right now.
Then add chopped onion. I used one small local onion.
I scored a 10 lb bag for 99¢ (compared to $3 for 2 heads of garlic). Small onions are great for use with daily meals, because you can use a whole one and not have to bother with storing the other half.
Side note: If you don't mind the onion smell, onions are a great way to clean the air: just leave a wedge on a plate.
Simmer for a few minutes, then add rosemary, oregano, thyme, and basil. Stir and add tomatoes. Simmer until they soften. After 15 min or so, if you have too much liquid, remove the lid and simmer until most of it cooks off.
Slice a baguette, toast it if you like, and top each slice with the tomato mixture. You can stop there, or keep going. I added slices of lachsschinken and marscapone. The 4 pieces were my lunch, but if you're making these as appetizers, you can make smaller servings.
Just in time for the holidays! Enjoy! (I did, and I already feel better.)
Friday, 3 January 2014
Chestnut Butter
Chestnut butter is delicious, but impossible to find here, so I make my own. Even chestnut paste is difficult to find. This chestnut butter recipe is very simple. All I used were whole chestnuts (only available around Christmas time here), honey, seeds from a vanilla bean, a pinch of salt, and some water.
Cut x's into chestnuts and boil them for about half an hour. Rinse in cold water, peel. Use a food processor and add all ingredients, add enough water to get a spreadable consistency (see photo below). Put into a jar and refrigerate. Chestnut butter like pumpkin butter is dicey when it comes to canning, because they're both so thick, so don't bother, unless you have access to an industrial canner.

Cut x's into chestnuts and boil them for about half an hour. Rinse in cold water, peel. Use a food processor and add all ingredients, add enough water to get a spreadable consistency (see photo below). Put into a jar and refrigerate. Chestnut butter like pumpkin butter is dicey when it comes to canning, because they're both so thick, so don't bother, unless you have access to an industrial canner.

Meyer Lemons
Meyer lemons are delicious, and here in Canada they're only available for a short time around Christmas. Each year I buy a bunch and preserve them in various ways. They're sweeter than lemons, their skin is more delicate, and they are very fragrant.
Here are some of my preserves:
Meyer lemon marmalade, which can be used on scones, bread, cakes, cupcakes, mixed into yogurt or ice cream (vanilla or sweet cream), or on its own; it's awesome.


Here are some of my preserves:
Meyer lemon marmalade, which can be used on scones, bread, cakes, cupcakes, mixed into yogurt or ice cream (vanilla or sweet cream), or on its own; it's awesome.

Three ingredients: lemons, sugar, water. That little pouch of cheesecloth contains the lemon seeds, which provide all the pectin you'll need for this tasty treat. Canning time 5 minutes.

Candied Meyer lemon slices:

lemon slices, water, sugar, cook down until all the liquid is gone. You can lay out the slices on a plate/cookie sheet/ parchment paper to dry. I don't bother, just put the slices in a jam bowl with a lid.
Meyer lemon sugar:

Grated Meyer lemon skin and cane sugar. You can do this with salt (and some herbs) as well and use as a rub for fish and chicken, in salads, wherever you want a savoury lemon flavour.
Meyer lemon chutney:


Meyer lemon slices with maple smoked sea salt, shallots, and truffle oil. I kept these in the fridge for a whole year. Very strong, so a little goes a long way. Had both chutneys with various white fish at Christmas. You don't need to wait that long, just give it a week or two for the flavours to mingle. By the end of the 12 months all the oil had been absorbed into the lemons. The flavour was very intense and salty.


Meyer lemon slices with crushed juniper berries, chilli flakes, maple smoked sea salt and oil.
Another thing I do is wash, dry, and freeze whole Meyer lemons (I do this with regular lemons as well). Then instead of squeezing lemon into my morning water, I grate the whole thing, so I get juice, pulp, and skin. You can also dehydrate slices and use in tea or water, or dehydrate skins (peel off before squeezing out juice which you can freeze in ice cube trays and add to water) and then crush/crumble into salads, soups, tea. Another way to preserve is to slice the lemon and layer it in a jar with sugar (I use raw cane sugar) and store in the fridge, then when I feel like lemon tea I just add a slice to my cup. Just don't waste any part of these yummies.
Friday, 5 July 2013
Quinoa Salad with Apple Cider Vinegar
Quinoa is a super versatile food, it's also tasty, healthy, and an ancient grain, meaning it hasn't been tampered with the way some other grains have been. Two years ago I planted some quinoa seeds in my backyard, but as soon as they sprouted, the bunnies cleared all the sprouts. I'd like to plant quinoa again, because it has amazing flowers and because I like using it in various ways.
This is a very simple quinoa salad. It can be adjusted by using various ingredients. What makes it yummy is the basic salad dressing, which is oil and apple cider vinegar.
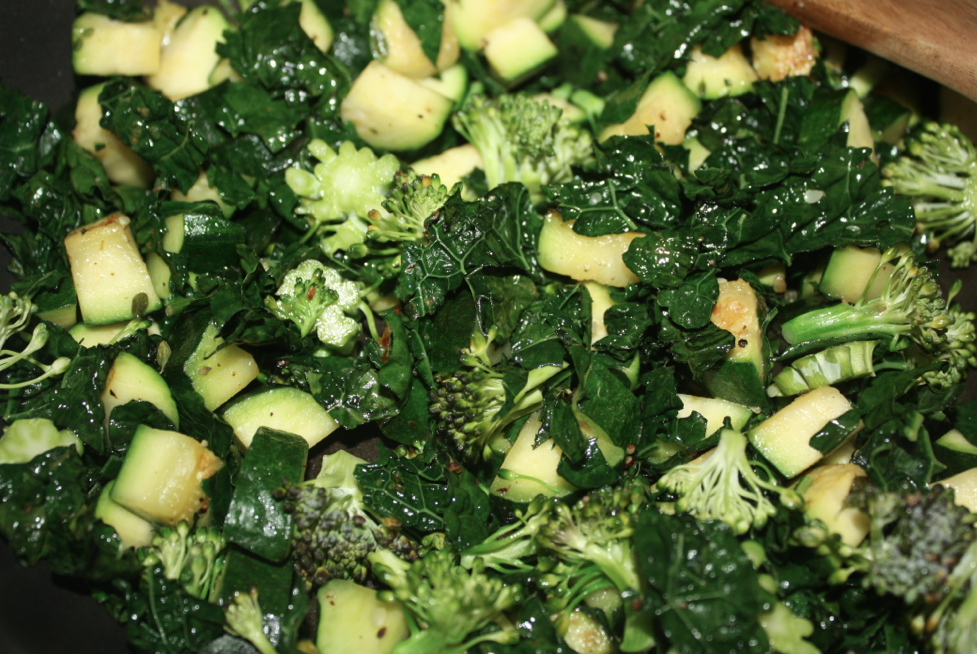
To start, cook some quinoa, I usually use one cup, and it makes enough for three meals. While the quinoa is cooking, heat some butter in a pan. Wash and cut up a zucchini, and add to the butter. Wash the kale, tear the leaves into pieces, discard the hard stems, and add to the pan. Cut up a head of broccoli and add it to the mix.
Cut up a tomato. I like plum tomatoes for stuff like this, because they aren't as juicy/seedy.

Once the quinoa is done, put it in a bowl, add the veg, season with salt and pepper, mix it all up. Pour a bit of apple cider vinegar and olive oil or grape seed oil over top, mix it in. Cut up some feta, and sprinkle over top. One of the grocery stores I go to sells Macedonian feta, which I prefer to the various Greek fetas. It's creamier and not as salty, almost like something between goat's cheese and Greek feta.

I've made this salad with peppers, onions, spinach, mushrooms, olives, sunflower seeds. You can use whatever you have on hand. A lot of the recipes I come up with are based on ingredients I have or need to use up. This salad is yummy warm or cold, and perfect for lunches and picnics.
Subscribe to:
Posts (Atom)